|
|
 Euro headlights for U.S. V8's
24/06/2004 22:04
|
 Edit
Edit
|
 Reply
Reply
|
|
|
Has anyone in the U.S. or Canada retro fitted their V8 with euro headlights? I have been looking for someone who makes a "plug and play" wiring harness but I have had no luck. Blaufergnugen makes wiring harnesses for nearly every model but not the V8. I already have a set of euro headlights sitting in my closet just waiting to be installed. Somebody please help!!!!!
Post Extras:


|
|
|
 Re: Euro headlights for U.S. V8's
 [re: Anonymous]
28/06/2004 14:10
|
|
Edit
|
Reply
|
|
|
Whats the difference
Post Extras:
|
|
Jeremy Ward
|
|
|
|
|
|
|
Reged: 14/05/2003
|
|
Posts: 202
|
|
Loc: Portland, Oregon (USA)
|
|
Re: Euro headlights for U.S. V8's
[re: Anonymous]
29/06/2004 20:23
|
|
Edit
|
Reply
|
|
|
Dave Head did a writeup on how to install a while back on the Audifans.com V8 list. Here is his email:
Since I installed my euros yesterday with Shawn's able assistance, I thought I would detail the procedure to help others intending the same or other projects (like replacing the radiator or adding a pusher fan).
This is easier if the car is on jackstands, since you're fussing underneath mostly.
Bumper/bumper cover removal is pretty simple. Each side of the cover 'snaps' in on each side near the wheel well. You have to 'pop' it outward and pull the edge of the wheel liner out so after you remove the mounting bolts the whole bumper cover/assembly will slide forward to be removed. You also have to remove the undertray/lower engine cover to access the 6 mounting nuts. Once you get the under cover off, take a glance around and note where all your oil/pentosin leaks are. Smile - your're not doing those today!
There are 6 mounting nuts - three on each side at the end of the frame rails. The 2 outside bolts on each side are relatively easy to spot. The other 2 are located on the inside of the frame rail. On 90/91 cars all are reasonable easy to get to. A ujoint can be helpful, along with a couple of extensions.They are either 15 or 17mm nuts. On 92 and up models the addition of the trans cooler and fan necessitated rerouting of the AC hose, making lower access to the inside driver's side nut miserable. We finally removed it by coming in from above with multiple extensions.
After removing the mounting nuts, simply slide the assembly forward. The wiring for the turn signals and foglights all goes to a central connector on the passenger side.. A small screwdriver helps lift up the connector to pop it off - its just a friction connection. There aren't any clips or locks to worry about. This all really takes under 1/2 an hour taking your time to get to this point. You can now remove the bumper assembly and put it beside the car.
Next you need to remove the chrome trim assembly. Remove the headlight wipers - 8mm socket - you have to kind of 'pop' them to get them unseated. Don't break them! They cost 80.00 apiece and there ain't no spare parts... When you look under the chrome trim, there's a ton of fasteners. You DO NOT need to remove them all! On each fender section of the trim there are 2 phillips head screws to be removed. In the 'corner'
area on each side of the headlight wiper areas you will see some brackets with 8mm nuts/washers that hold the trim assembly. You can spot them pretty easily. The mounting holes are elongated so you can adjust the trim alignment. 2 per side. Remove these only and the entire chrome trim and painted section under each headlight can be removed as a complete unit (slowy guide it forward and don't bend the wiper shafts) and dropped under the car.
Stand back and look at your car. You have transformed on of Audi's most elegant front ends into an ugly beast (my wife about fainted).
Now you have complete access. 5 bolts hold on each headlight. 2 8mm bolts up on top hidden under them purty black trim caps (don't let Shawn near your car - he lost one). Below there is a 10mm bolt right by the intake horn, and then there are 2 8mm long bolts that pass through plastic spreaders. One is about dead center under the headlight, and the other is on the side. Be careful fussing with those spreaders. They actually slide/clip into the headlight assembly, and if you aren't careful you can break one of the 'wings' off. You can remove the headlights now. If you are only replacing a headlight, twist the bulbs to release them and remove. The sidemarker connector has little lock tabs that can give you a little grief.
If you're putting in euros, you will only use 5 of the 6 wires from your wiring harness. The ground (brown) wire for the sidemarker is not used.
Here's the info from Dave Forsythe's post a few years back:
there are numbers molded in the case on the back of the lamp next to the pin it locates .
56b LOWBEAM POSITIVE TOP LEFT PIN
56a HIGHBEAM POSITIVE TOP RIGHT PIN
57 SIDEMARKER LIGHT MIDDLE LEFT PIN
58 INDICATER LIGHT IN HEADLAMP MIDDLE RIGHT PIN
Wire 57 & 58 TOGETHER (meaning you take both wires from these pins to a common connector - this goes to the sidemarker positive)
31 GROUND LOWER LEFT PIN
31 GROUND LOWER RIGHT PIN
wire 31 & 31 TOGETHER (or you can take the low beam neg to one terminal and the high beam neg to the other terminal for a cleaner wiring job).
If you look at your wiring harness and remember that the low beams are on the outside, and that all ground wires are brown its pretty simple to wire it up.
If you want to do a pusher fan, its a breeze at this point. Makes your AC work fantastic in traffic, only a marginal effect on cooling. Remove the 4 10mm bolts that hold the AC condensor on. It will come away and you can roll it forward and down without disconnecting any hoses. A slimline 14" electric fan works best in my opinion. Orient the fan towards the passenger side. The mounting system uses plastic ties that go through from the back of the condensor and hold the fan one. It literally takes less than 5 minutes to install the pusher fan. Bolt the AC condensor back up and you can then wire it up at your convenience. I used an adjustable thermostatically controlled setup with the temp probe attached to the upper radiator hose. Power comes from the positive jumper terminal. Ground can be easiest at the factory electric fan ground point on the driver's side inner fender.
When putting the bumper back on, its doable with one person, but easier with two. Put the trim on first. It can be scary trying to align the trim and those wiper shafts. Be patient... The bumper has guides on each fender that guide it back together. Doing it by yourself, its hard to orient correctly, but not impossible.
There you go!
1990 V8Q Zyclam
Portland, Oregon (USA)
http://www.MyV8Q.com/
Fun, Fun, Fun auf der Autobahn
Post Extras:
|
|
Jeremy Ward
|
|
|
|
|
|
|
Reged: 14/05/2003
|
|
Posts: 202
|
|
Loc: Portland, Oregon (USA)
|
|
Re: Euro headlights for U.S. V8's
[re: steve B]
29/06/2004 22:58
|
|
Edit
|
Reply
|
|
|
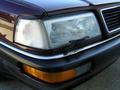
US headlights are 2 peices; clear corners are a seperate plastic piece (not glass). The mirror reflectors inside and the 'ribbed' glass do not allow the light to shine as brightly. The US lights use P9005 and P9006 bulbs, where as the European headlights use H3 and H4 style bulbs. These bulbs have different connectors, so we have to do some rewiring to make the Euro lights work in our cars. Also, European V8s have a switch in the dash to adjust the headlight beam up and down (so if you are driving fast, you can focus your lights further off in the distance), the US headlights are fixed in one spot.
You can see the differences here:
http://198.107.18.114/v8q/pics/USA-Scheinwerfer.jpg
http://198.107.18.114/v8q/pics/4AAOG/DSCN0860.JPG
Regards,
- Jeremy
1990 V8Q Zyclam
Portland, Oregon (USA)
http://www.MyV8Q.com/
Fun, Fun, Fun auf der Autobahn
Post Extras:
|
|
|
Re: Euro headlights for U.S. V8's
[re: Jeremy Ward]
30/06/2004 20:14
|
|
Edit
|
Reply
|
|
|
ive got some used lenses. any good?
steve b
Post Extras:
|
|
 Flat
Flat
 Threaded
